Data presentation
Contents
Figures, tables and other display items are often the quickest way to communicate large amounts of complex information.
Many readers will only look at your display items without reading the main text of your manuscript. Therefore, choose and design your figures and tables very carefully so your manuscript communicates well with readers.
Display items are also important for attracting readers to your work. Attractive display items will hold the interest of readers, and compel them to take time to understand a figure.
Finally, high-quality display items give your work a professional appearance. Readers will assume that a professional-looking manuscript contains professionally done science. Thus readers will be more likely to believe your results and your interpretation of those results.
The advice below includes detailed information that is specific to BMC journals, for formatting display items:
This section provides general information for authors creating figures to maximize the quality of those illustrations and to prepare artwork for submission to BMC journals. Guidelines on specific types of figures and on supported file formats are also available from the relevant journal.
BMC encourages authors to use figures where this will increase the clarity of an article. The use of colour figures in articles is free of charge.
BMC journals publish articles in a typeset final PDF version and full text web version within a few days of acceptance.
In the author PDF, figures are included sequentially at the end of the article, one to a page. Figures in the full-text web version of an article are linked directly from the text each time they are mentioned and open in a new window. In the typeset PDF figures are placed appropriately within the text, as close as possible to their first mention in the text.
Most BMC journals do not redraw author-provided figures. It is the author's responsibility to ensure that figures are provided at a sufficiently high resolution to ensure high quality reproduction in the final article.
Production of the final full-text web and PDF versions will proceed more quickly if authors submit figures in accordance with BMC's guidelines as specified in this document.
Preparing figure files for submission
- Illustrations should be provided as separate files, not embedded in the main manuscript file.
- Each figure of a manuscript should be submitted as a single file.
- Tables should NOT be submitted as figures but should be included in the main manuscript file.
- Multi-panel figures (those with parts a, b, c, d etc.) should be submitted as a single composite file that contains all parts of the figure.

- Figures should be numbered in the order they are first mentioned in the text, and uploaded in this order.
- Figures should be uploaded in the correct orientation.
- Figure titles and legends should be provided in the main manuscript, not in the graphic file.

- Individual figure files should not exceed 10 MB. If a suitable format is chosen, this file size is adequate for extremely high quality figures.
- Please note that it is the responsibility of the author(s) to obtain permission from the copyright holder to reproduce figures (or tables) that have previously been published elsewhere. In order for all figures to be open access, authors must have permission from the rights holder if they wish to include images that have been published elsewhere in nonopen access journals. Permission should be indicated in the figure legend, and the original source included in the reference list.
Detailed guidelines for the following types of figure are available.
- Line drawings and diagrams
- Charts and graphs
- Large plot graphs
- Photographs
- Medical X-rays
- Micrographs
- Screenshots
- Genetic information and sequence alignments
- 3D atomic structures
- Chemical reaction schemes
- Electrophoretic gels and blots
Supported file formats
The following file formats can be accepted.
- EPS (suitable for diagrams and/or images)
- PDF (suitable for diagrams and/or images)
- Microsoft Word (suitable for diagrams and/or images, figures must be a single page)
- PowerPoint (suitable for diagrams and/or images, figures must be a single page)
- TIFF (suitable for images)
- JPEG (suitable for photographic images, less suitable for graphical images)
- PNG (suitable for images)
- BMP (suitable for images)
- CDX (ChemDraw - suitable for molecular structures)
- TGF (ISIS/Draw - suitable for molecular structures)
Figure size and resolution
Figures are resized during publication of the final full text and PDF versions to conform to the BMC standard dimensions, which are detailed below.
Figures on the web:
- width of 600 pixels (standard), 1200 pixels (high resolution).
Figures in the final PDF version:
- width of 85 mm for half page width figure;
- width of 170 mm for full page width figure;
- maximum height of 225 mm for figure and legend;
- image resolution of approximately 300 dpi (dots per inch) at the final size.
Illustrations should be designed such that all information, including text, is legible at these dimensions. All lines should be wider than 0.5 pt when constrained to standard figure widths. Note that all fonts must be embedded.
Figure file compression
- Vector figures should if possible be submitted as PDF files, which are usually more compact than EPS files.
- TIFF files should be saved with LZW compression, which is lossless (decreases file size without decreasing quality) in order to minimize upload time.
- JPEG files should be saved at maximum quality.
- Conversion of images between file types (especially lossy formats such as JPEG) should be kept to a minimum to avoid degradation of quality.
Figure legends
Figure legends should be included after the reference list in the main manuscript text file rather than being a part of the figure file. For each figure, the following information should be provided:
- Figure number (in sequence, using Arabic numerals - i.e. Fig 1, 2, 3 etc.)
- Short title of figure in sentence case (maximum 15 words - required)
- Detailed legend (up to 300 words - optional)
E.g. Fig. 3 Liver smear from a 6-week-old embryo (CR length 12 mm). A remarkable cluster of macrophages is seen among primitive erythroblasts (see also Fig. 4). A granuloblast is present at the upper right. H & E, ×1,150. (Scott 1974).
Chemical schemes
Chemical scheme images, unlike figures, should be included as part of the manuscript. CDX is the file format for saving chemical reaction schemes prepared using ChemDraw. Suggested ChemDraw settings are:
- Chain Angle 120°
- Bond spacing 18%
- Fixed length 0.406 cm (11.5 pt)
- Bold width 0.056 cm (1.6 pt)
- Line width 0.018 cm (0.5 pt)
- Margin width 0.046 cm (1.3 pt)
- Hash spacing 0.071 cm (2 pt)
Scheme legends should not form part of the embedded scheme image, but should appear immediately after the scheme in the text. Please include a legend comprising:
- Scheme number (in sequence, using Arabic numerals - i.e. Scheme 1, 2, 3 etc.)
- Short title of scheme, in sentence case (maximum 15 words - required)
- Detailed legend (up to 300 words - optional)
e.g. Scheme 1. An overview of glycolysis by which the conversion of glucose to pyruvate is coupled to the production of ATP for energy and NADH for biosynthesis. The entry of glycerol into the glycolytic pathway is also shown. The scheme indicates the hypothetical action of carnosine in the activation of fructose 1,6-bisphosphatase to create a futile, ATP-consuming, cycle which also inhibits glycolytic ATP generation.
Electronic manipulation of images
Enhancement of digital images using image-editing software can increase clarity of figures and is acceptable practice, if carried out responsibly. It is crucial, however, that artefacts are not introduced and the original data is not misrepresented. Details of significant electronic alterations to images must be given in the text of the article. Linear adjustment of the color, contrast or brightness are permitted, but they must be applied to the entire image, not just parts of it.
Original, unmanipulated source images should be retained by the author, as BMC will support requests from referees to view the original files.
Useful software
There are many software packages capable of converting to and from the major graphics formats. Good general tools for image conversion and enhancement include Adobe Photoshop (Mac/Windows), GraphicConverter (Mac only), PaintShop Pro (Windows only).
A variety of cross-platform open-source sofware is also available for this purpose, including ImageMagick, GIMP, and ImageJ. Each of these packages runs on Mac,Windows and Linux.
Frequently asked questions
- What do I do if my figure is larger than one page?
If it is not possible to scale your figure onto a single page we recommend that you submit and refer to it as an additional data file rather than a figure. You may wish to include some part of it (for example, a single panel or an appropriate segment) as a figure to bring the data to readers' attention and then refer to the complete version as the additional file. Please remember to remove the legend from the list of figures (renumbering the remaining figure legends, if necessary), move the legend to the list of additional files, and renumber the citations in the text.
- What should I do if my figure is split into separate parts, 1a, 1b and 1c?
BMC requires that multipart figures be submitted as a single composite image file. Please combine the separate parts of your figure into one single file, if possible using the same software that was used to create the individual parts. If the panels of the figure were created using different software, use either Microsoft Word or a graphics-creation program to produce the composite figure and submit as DOC, PDF or EPS. If large subsections of the figure cannot be combined (e.g. because the final file size would be too large), please submit these as separate figures and renumber them appropriately.
- What should I do if my figure exceeds the 10 MB submission limit?
All figures and additional files submitted to BMC must be below 10 MB in size. This file size is sufficient for very high resolution, print publication quality images, if suitably prepared. There are a number of reasons why figure file sizes may be unnecessarily large. In some cases, unnecessary conversion between file types may cause figure file size to grow, so going back to the original source may help. If your figure is a TIFF, try resaving as a (compressed TIFF). If it is a photographic image, consider resaving it as a high quality compressed JPEG. If your figure is an extremely complex vector diagram or plot, it may be necessary to convert it to a (bitmap).
- Why must I submit figure files separately from the manuscript? Why can't I submit a single composite manuscript file containing everything?
Figures embedded within text files require manipulation before they are suitable for production purposes. This can lead to loss of resolution, making the files unfit for publication. We therefore recommend that you submit separate high-resolution files for each figure. A number of versions of an article are required at different times: the manuscript sent to reviewers; the final full-text web and PDF versions. For each of these stages BMC uses automated processes to assemble the manuscript and include and label the figures appropriately. The automated processes require figures to be submitted separately.
If you have other questions or are experiencing a particular problem with figures, please contact the Customer Service team at info@biomedcentral.com.
All figures submitted to online-only journals published by BMC should be submitted at their actual size - see here a list of accepted figures formats.
Example of a suitably cropped figure
Ideally the figures should be cropped so that there is no unnecessary white space bordering the image. The cropping of figures improves accuracy when placing the figure in combination with other elements, when the accepted manuscript is ready for publication on the website.
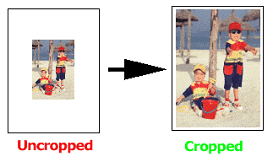
(courtesy of T Gambichler, BMC Dermatology2001 1: 6)
Figures submitted in formats like PowerPoint, Word, BMP, TIFF, PNG and Vector images would be accepted. Read on for pointers on how to crop images in these formats.
Cropping figures created or saved in PowerPoint
From the View pull-down menu, ensure that the Ruler option is selected, and measure the dimensions of the image. Select all the elements in the slide (ctrl+a) and then cut these elements (ctrl+x). From the File pull-down menu, select Page Setup and change the dimensions of the slide to match that of the image. Paste the elements back into the slide (ctrl+v).
Cropping figures saved in Word
From View pull-down menu, select Print Layout. Next click Page Setup on the File pull-down menu and reduce the page margins (Margins tab) to zero, then change the dimensions of the page (click the Paper size tab) to match that of the image.
Bitmap figures
Bitmap image files can be created and manipulated using image-editing programs such as MS Paint, Corel Photo Paint, Adobe Photoshop and Jasc Paintshop Pro.
Common bitmap formats include BMP (bitmap), TIFF (tag image file format), PNG (portable networks graphics) and JPEG. The process for cropping these files may differ according to the software used. We recommend that you crop bitmap figures in the software you originally used to create the image; unfortunately we cannot give detailed instructions here for every software program, but have provided instructions for some standard programs.
Please note that Bitmap images are resolution dependent. Therefore the resizing of an image may result in the loss of quality
Cropping a BMP file using MS Paint
By clicking on the broken rectangular line, select the area of the image to be cropped. Copy the selected image (ctrl+c or Edit/copy). Open a new document (ctrl+n), and paste the image (ctrl+ v) here. Go to Image/attributes or ctrl+E and adjust the width and height accordingly, ensuring that units are in centimetres (cm).
Cropping a PNG file using MS Paint
Once PNG files are opened in Internet Explorer, they can saved as a .bmp file and then cropped using MS Paint, using the above instructions.
Vector figures
Vector images can be created and manipulated using a wide range of programs. Examples of such are Adobe Illustrator, CorelDRAW and Macromedia Freehand.
Common vector formats are PDF (portable document format) and EPS (encapsulated postscript).
In contrast to bitmap formats, vector files are resolution independent and therefore the size of vector images can be increased or decreased without a loss in quality.
Cropping a PDF file using Adobe Acrobat
From the Document menu select Crop Pages. The Crop Pages dialog box will appear. Change the page margins by using the up and down arrow keys for each margin (left, right, top, bottom).
Alternatively, cropping can be done by selecting the crop tool from the toolbar. Here the cropping boundaries are set by selecting a handle at a corner of the cropping rectangle, and dragging it to the correct size.
Cropping an EPS file
EPS files can be generated by all drawing applications. We advise that you crop an EPS image using the same software as was used to create it (refer to the manufacturer's documentation).
If you have problems cropping your PDF or EPS image then, as a last resort, you may consider rasterizing it (converting from vector to bitmap format) using Photoshop, cropping the bitmap (again using Photoshop) and submitting the resulting bitmap image in TIFF or JPEG format. However, rasterization will typically increase file size and reduce quality, compared with a vector image.
If the file format is not listed, then please contact editorial@biomedcentral.com.